Beauty Q&A: Nails 101
by Jane Marie and Jolie Kerr

Jolie: I have fingernail anxiety. Well. I have anxiety in general but today we’re going to talk specifically about my fingernail anxiety. The issue is this: I like a nice looking hand. I admire the sort of woman who always has a manicure. I aspire to be that sort of woman! But I cannot, for the life of me, sit still in a salon long enough to let things dry and then I get angry with myself for ruining the manicure I just paid for but also I can absolutely not manage to get my cuticles looking remotely acceptable on my own, though I am rather good with the painting part of things, and do you see what I mean about the anxiety?
The other thing is this: I’m writing a book and spending a lot of time staring at my hands and also am in desperate need of any and all new procrastination methods because I am the least disciplined writer ever apparently, and what better way to justify procrastinating than to tell yourself you’re Learning A New Skill? Well, now I am Learning The Skill Of Fingernail Doing. But… I have questions:
Do I really need to use a base coat? Is the fact that I don’t use a base coat the reason that my polish doesn’t go on smoothly/gets streaky/darker in one spot and lighter in another?
Yes, yes, yes, yes. Girl, get a base coat! What is the deal? What are you afraid of? I actually know what you’re afraid of: you think it’s going to add time to your manicure, and to you, time is the enemy. Well, time is the thing the ladies with perfect nails are willing to endure, so… You cannot beat them with magic or a secret product only they know about. No, you can only join them, or keep wishing to no avail. The choice is yours!
First, a note about all nail lacquers, from base to color to top coats: they’ve gotta be fresh. Nail polish is a lot like, um… eggs? Yeah, eggs. You know how eggs can be delicious for a long time, but if you want to make perfect and beautiful meringue you need fresh ones? I realize this metaphor isn’t quite working, but nail polish is like that. You need the paint to be fresh in order for it to work well and look it’s best, which means that if you don’t own a salon, there’s going to be waste. That is just a fact of nail life. I probably get through no more than half a bottle before tossing most polishes due to goopiness, hair and crusty crumb invasions, or color separation. Okay, now where were we?
In your infinite quest to understand nails stuffs, you went on to ask about how to deal with “two nails that have green splotches on them because the color wouldn’t entirely lift off.” The answer? Buh-huh-huh-hase coat! I’m not a scientist, so there could be something else going on, but it seems that bast coat is a lot like a primer you would use when you paint a room, or one you’d smear on your face before using foundation. It not only smooths out textural imperfections, but it’ll cover discoloration and create a barrier between the paint and the surface of your nail. You know how people are always talking about their nails yellowing after using red polish nonstop? Base coat protects against that sort of staining. My nails — which never go without polish, and are often painted pink or red — are living(?) proof.
Seche Base is my favorite base coat for a few reasons: 1. It dries quickly. 2. It sort of helps fill the ridges in my thumbnails (they’re deep, so nothing totally fills them in). I hate to buff the ridges out of my nails because it makes them thin and floppy and then they eventually break and split. 3. It’s actually really pretty on it’s own — a sheer, pearly white — so I can stop mid-manicure if I get asked out on a hot date on Nail Night.
Play around, though, to find the formula you like working with best.
What brand or type of top coat do you recommend?
For a clear, quick-drying top coat, I stick with the same brand: Seche Vite. I think it’s excellent in terms of thickness and how fast it dries. I apply rather soon after my last coat of polish, just when it’s barely dry to the touch. If you do it when your polish is too wet, it can come off on the brush OR you might get those little bubbles under the top coat. If you wait too long, you might not be able to pick your nose until foreverrr, and also it’ll lose its ability to smooth out mistakes you’ve made in your polish application.
There are also a few “fun” top coats out there that I use regularly. Sephora by OPI has a line of Jewelry Top Coats, and “Only Gold For Me” is in heavy rotation over here at the moment. Also, the top coats in Essie’s Luxeffects line are fun, but a little… hm… “young” looking? So I only use those on holidays. With either of these lines, it’s not necessary to apply a clear top coat afterward.
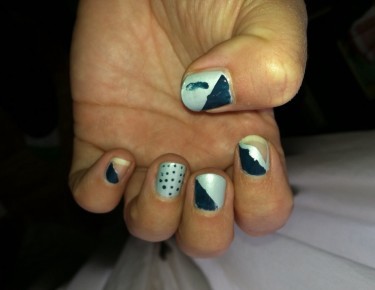
At what point do you use the top coat? I know with crackle finishes the top coat goes on over the crackle, but what about with nail art (like dotting or tape manicures)? Glitters?
Last! Always. I personally love the glassy finish it gives my nails, even over rhinestones and chunkier glitter. Plus, it lends 3D nail art staying power. But the great thing about nail art is that it’s art and it’s yours, so do whatever looks best to you. If you like the look and feel of raw glitter better, you can skip a top coat altogether, but you’ll be reapplying your polish more frequently in that case as it’ll probably chip a lot sooner.
Speaking of which, do you have any nail art websites that you really dig?
If you don’t get too jealous of girls who get to live in London, WAH Nails is the best. And Pinterest. Finding nail art ideas is really the only thing I use Pinterest for. Just search on nail art and scroll for days. That’s how I found THESE CALCULUS THEMED NAILS, WHAT OMG.
What kind of nail varnish remover is best?
First, what I hate: those prepackaged nail polish remover pads — unless I’m travelling somewhere that doesn’t have a drug store and need to limit liquids — and the thingy with the sponge that you stick your finger in. Basically, I hate any gimmicky nail polish remover. You know what works best? Plain old drugstore brand nail polish remover and large 100% cotton balls. Because I don’t have acrylics, I use an acetone remover which works well on chunkier things like glitter — though with some glitter I have to remove the top coat, buff a little with one of those buffing blocks, and then use nail polish remover again. It’s a pain in the ass. If you feel like your nails or hands are drying out too much, try Cutex. They have emollients in their removers that’ll combat that, although you’ll want to wash those off your nails before you polish or it won’t stick, so that is some damn contradictory advice right there, that’s what that is! And if you have acrylics or wraps, you must use non-acetone remover or you will destroy them thangs.
Am I correct to think that the crackle polish is a good thing to use to extend a slightly raggedy looking manicure? Or am I just looking for easy solutions where there aren’t any?
Yes, and maybe? I would say that’s a really smart idea, except for it ignores, or is born out of you not using, one thing: top coat. Where is the top coat you applied earlier in this equation? Are you painting the crackle polish over your chipped top coat? That’s a hell of a lot of polish to have on your hands. And you’re probably not going to put a top coat over the crackle, are you? So that’s just going to chip off in a day or two anyway. Again, up to you, but in the face of all of that, I just cancel my plans for the next hour and do a proper job. Which I am not ordering YOU to do, but if you want your nails to look great, then yes, I am. 🙂
Can you suggest a reasonably priced nail dryer? Like the ones in the salon with the infrared lights that assuredly are giving me cancer? Not the fan-only ones, I’ve no patience to sit that long.
No. First, UV rays scare me. They’re probably safe, but I’m not going to look it up. And second, just sit still for 10 minutes!!! I think it will help you in so many ways, not just in your nails. Just relax and take a valuable break. This whole deal, the manicure, will take less than an hour, start-to-finish, once a week. You should actually be chilling out a ton more than that. Prioritize time to zone out on something like this, m’lady, or you will get sick and DIE. You think I’m joking!
What’s the best way to deal with my cuticles on my own? Basically I get a professional manicure every 4–6 weeks mostly so that my cuticles get dealt with, but there has to be a way I can do them on my own. I’ve had some luck with cuticle cream and/or oil but I dunno… it still feels like I’m majorly missing something that other women know how to do.
Like a lot of shit, cuticles come in all shapes and sizes. Mine, for example, never adhere to my actual nail, so scraping is rarely necessary. They do, however, become dry and crack at the corners, so I need to trim them with cuticle trimmers like these before they start catching on things and bleed. You may have the opposite kind — the ones that look like a paper-thin web has grown between your skin and the white half-moons of your nail bed. If so, apply a cuticle softening lotion like this one, or an oil if you prefer, then soak them in warm, soapy water for about five excruciatingly long, relaxing minutes. Wipe them off and take the flat side of an orange stick to detach that skin from your nail, pushing back toward your skin, but not too hard. A lot of people are squirming right now, thinking “WHYYY!? Nature did not intend for you to remove your cuticles! They must have some benefit?” And they might be right? How would I know? What I do know is that it’s really hard to paint pretty polishes over that junk, so if you want to gain a few more millimeters of polish area and have a nice smooth cuticle, this is the way.
Think long and hard before you go the way of the trimmers, though. They are addictive and it’ll be hard to quit using them. My best advice if you think you need to trim them by cutting is to have it done by a pro once or twice and pay VERY CLOSE ATTENTION to their technique. They’ll start the same way, with a nice long soak in some warm, soapy water. Then, they’ll trim off any parts that look “pruney.” Go slow and think “moderation,” because remember: after the prune look goes away in an hour, they’ll look 1,000 times better than they did while you were hacking away at them.
I have Googled up, down and sideways but cannot find out where to buy that mystery pink lotion they use at nail salons here in NYC.
I’m guessing it’s something that comes in bulk. Maybe you could start a manicure supply co-op in your building?
Do you have any sub-$5 nail polish brands you like? Sally Hansen, Wet n Wild, Milani, and Sinful Colors are all ones I’ve read about. I’ve had REALLY good luck with the Wet n Wild FastDry polishes, except that they make me feel like I’m 10-years-old every time I look at the Wet n Wild bottle.
Grow up, Jolie. Just kidding! Don’t, ever. First, remember that those little skinny brush bottles are all really cheap — like $2 — so you can collect up a bunch to layer over the polishes you already own but are totally sick of. Suddenly you’ve doubled your choices! Add a hot pink french tip, a few stripes, some dots…
I don’t personally dig the WnW, but that is what’s great about opinions. My favorite cheapies are Milani, which you mentioned, and Prevail, which you didn’t because it’s a weird one that I’ve only found on occasion in random endcap displays at the Duane Reade on Delancey in NYC. But again, if you like it, you like it. For me, the base and top coats go SO FAR in making your nails look professionally done, that the color itself is kind of the least of my worries. The only drug store polishes I don’t really like are the ones that claim to dry in under a minute. They may work fine at first, but they tend to get goopy after just a few uses.
And finally, I’ve been trying to create this effect and am bombing out, so if you know of any good tutorials on the technique let me know!
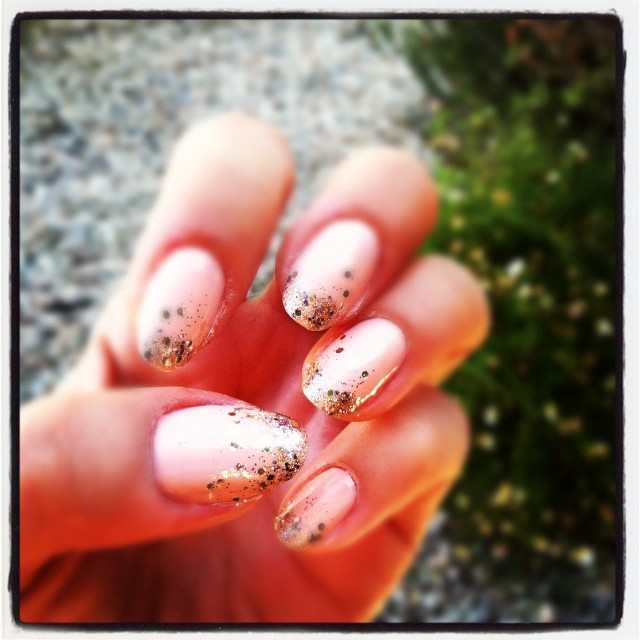
Ooh, ooh, I DO know this one! Here’s my technique, which I used to do the look above. You can also place the glitters at the base of your nail rather than the tip for an even trendier effect. Okay, here goes:
1. Apply a base coat.
2. Apply one coat of color over your entire nail. I used Essie’s “A Crewed Interest,” which makes no sense as a name for “peach.”
3. Apply another coat of color on your nail but skip the very edge where most of the glitter will be. This is so you don’t get 5 coats of polish piled up in that area, which would look bumpy and take forever to dry. Don’t worry if your nails look uneven after this step.
4. Apply a thinnish line — like the width a french manicure would be — of fine glitter from a bottle with a skinny brush. I used Art Deco’s “Silver Glitter.”
5. Apply a thicker sloppy line over almost half of your nail with a chunkier glitter. Don’t worry about it being uneven. Look how uneven mine are and it’s fine! If you don’t want the big glitters, I still recommend this technique, but just have the second coat of fine glitter come from a bottle with a large brush. I used Sephora by OPI’s “Only Gold For Me.”
6. Top coat on the half that didn’t get the glitter top coat.
Previously, in Nail Art: How to Give Yourself an Amazing Hand Job.
Previously, in Q&As: Hair Products 101.
Do you have a question for Jane?