A Femme’s Guide to Improvement: Home Ec 101
by L M

Thus far we’ve wrapped and bundled and knotted and hammered, so let’s change course for a hot second and go for something pretty much anyone can do and that all the skirt-wearing among you are able to use: the $10, 30-minute skirt tutorial, for beginners. ($5 if you already have thread and elastic! A little more than 30 minutes if you don’t have a sewing machine, though.) Blind hems, basting, cartridge pleats, interfacing, stitched chains, setting waistbands and sleeves, boning…all that’ll come later. This is super-basic, you-don’t-even-need-a-sewing-machine wardrobe improvement. The kind of project where you answer “How did you do that?!” with “Common sense!” I have three of these skirts and live in them.
You’ll need:
— A needle or a sewing machine
— A couple feet of elastic, not more than one inch wide (I prefer 1/2-inch)
— Half a yard (or so) of a medium-weight fabric. Linens and woven (not stretchy, aka knit) cottons work well for this, and most won’t cost you more than $10–15/yard.
— All-purpose thread that matches your fabric
— An iron
— Pins (optional, depending on your dexterity)
Clothing fabrics generally come in two widths at most stores: 45” and 60”. Unless your hips are really small, or unless you want a narrow, rather than puffy, skirt, you’ll want one in a 60” width. The finished edges of a roll of fabric are known as the selvage. Sewer, selvage. Selvage, sewer. The selvage is your new best friend if you’re lazy, a novice, or don’t have a machine that can do an overlock stitch. Your first step is deciding how long you want your skirt to be: measure from your waist to wherever you want the hem to go, add four inches to that, and then cut your fabric to that width. (Basically, you’ll be trimming away a strip from one of the already cut edges. Don’t cut off the selvage!) I went with 17 inches, adding two inches to each side for the hem and elastic casing, which was a total of 21 inches.
Lay your half-yard on an ironing board right-side down (the back of the fabric up) with one of the cut edges facing you. Fold it over about half an inch — this isn’t rocket science or soufflé-baking — and iron it down. Then fold it over itself again and iron again, so that the cut edge is completely hidden, like so:

This will be your hem. Repeat on the other cut edge, making it a little wider than the elastic you’ve chosen. You can pin these folds in place or not, depending on their tendency to stay ironed and in place. (Linen’s great for a first-time project like this, because it has a good structure and stays put when you iron it.)
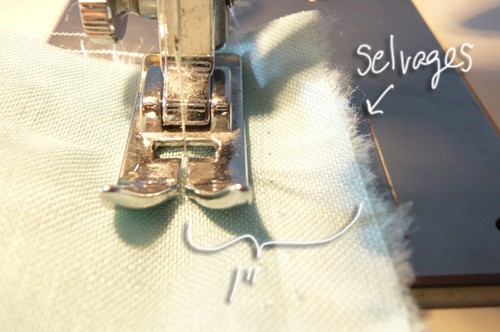
Next, turn your fabric over, so that it’s right-side up. Fold it so that the two selvages are lined up and, if you want to, pin it in place about an inch from the border. (The right side of the fabric will now be hidden, the wrong side facing out.) You’ll need to unroll your ironed bits to pin the whole length of the edge, but don’t worry — they’ll get folded back in place. Ready for your first seam? Either with a needle and thread, or with a running stitch on your sewing machine, sew the selvages together an inch from the border!

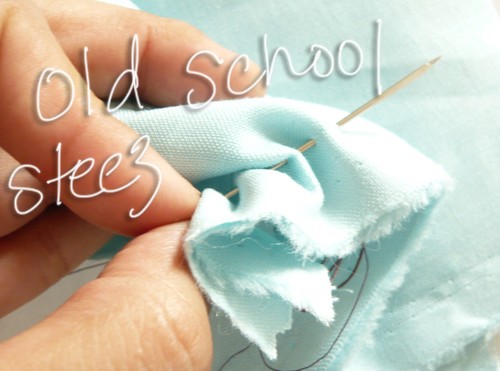
For sewing by hand, to keep stitches small and neat, I like to bunch the fabric up on the needle before pulling through. This speeds up the process considerably — and the longer your needle, the quicker your project will go.

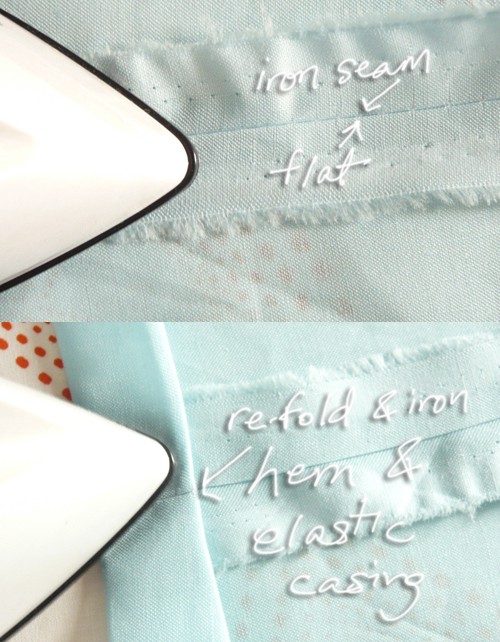
Once you’re done, part the selvages and iron it flat. This is the back of your skirt! Put the folds of your hem and elastic casing back in place, and iron them flat again.

At this point, you should have a tube of fabric, with the seam on the selvaged edge, and your ironed hem and elastic casing at the bottom and top of the tube, respectively. Next, stitch each of these in place, either by hand as before, or with a machine using a running stitch. You want this to be as far as possible from the edge of the tube, or else your hem’ll look sloppy. If you have trouble keeping your seams straight, you can get a magnetic seam guide that snaps on the sewing machine’s throat plate and, well, guides the edge of the fabric.

When you do the top of the skirt, where the elastic goes, don’t sew it all the way down yet: you’ll need to leave a couple inches unsewn through which to thread the elastic. Pull the elastic around your waist: you want it to be snugger than you think, as the weigh of the fabric will pull it down. Add an inch to that, and cut. Put a safety pin on the end of your elastic and work it through the slot you created in the skirt; once it’s all the way through, sew the two ends of the elastic securely together. Spread flat the fabric around the unsewn opening, and sew it shut. You can let the gathered edge show or put a belt over it, which is my tendency.

OMG. No. Way. You made that?? You made that!
Previously: Sprung Seating.
Lucia Martinez reads too many old poems and tries to be a lady.